
12.列表渲染
1. 基本列表
v-for指令:
- 用于展示列表数据
- 语法:v-for=”(item, index) in xxx” :key=”yyy”
- 可遍历:数组、对象、字符串(用的很少)、指定次数(用的很少)
1 |
|
运行结果图如下: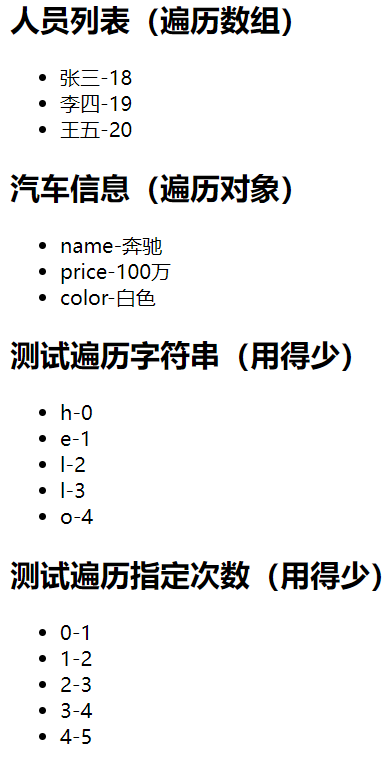
2. key的原理
面试题:react、vue中的key有什么作用?(key的内部原理)
1. 虚拟DOM中key的作用:
key是虚拟DOM对象的标识,当数据发生变化时,Vue会根据【新数据】生成【新的虚拟DOM】,
随后Vue进行【新虚拟DOM】与【旧虚拟DOM】的差异比较,比较规则如下:
2. 对比规则:
(1) 旧虚拟DOM中找到了与新虚拟DOM相同的key:
- 若虚拟DOM中内容没变, 直接使用之前的真实DOM!
- 若虚拟DOM中内容变了, 则生成新的真实DOM,随后替换掉页面中之前的真实DOM。
(2) 旧虚拟DOM中未找到与新虚拟DOM相同的key:
创建新的真实DOM,随后渲染到到页面。
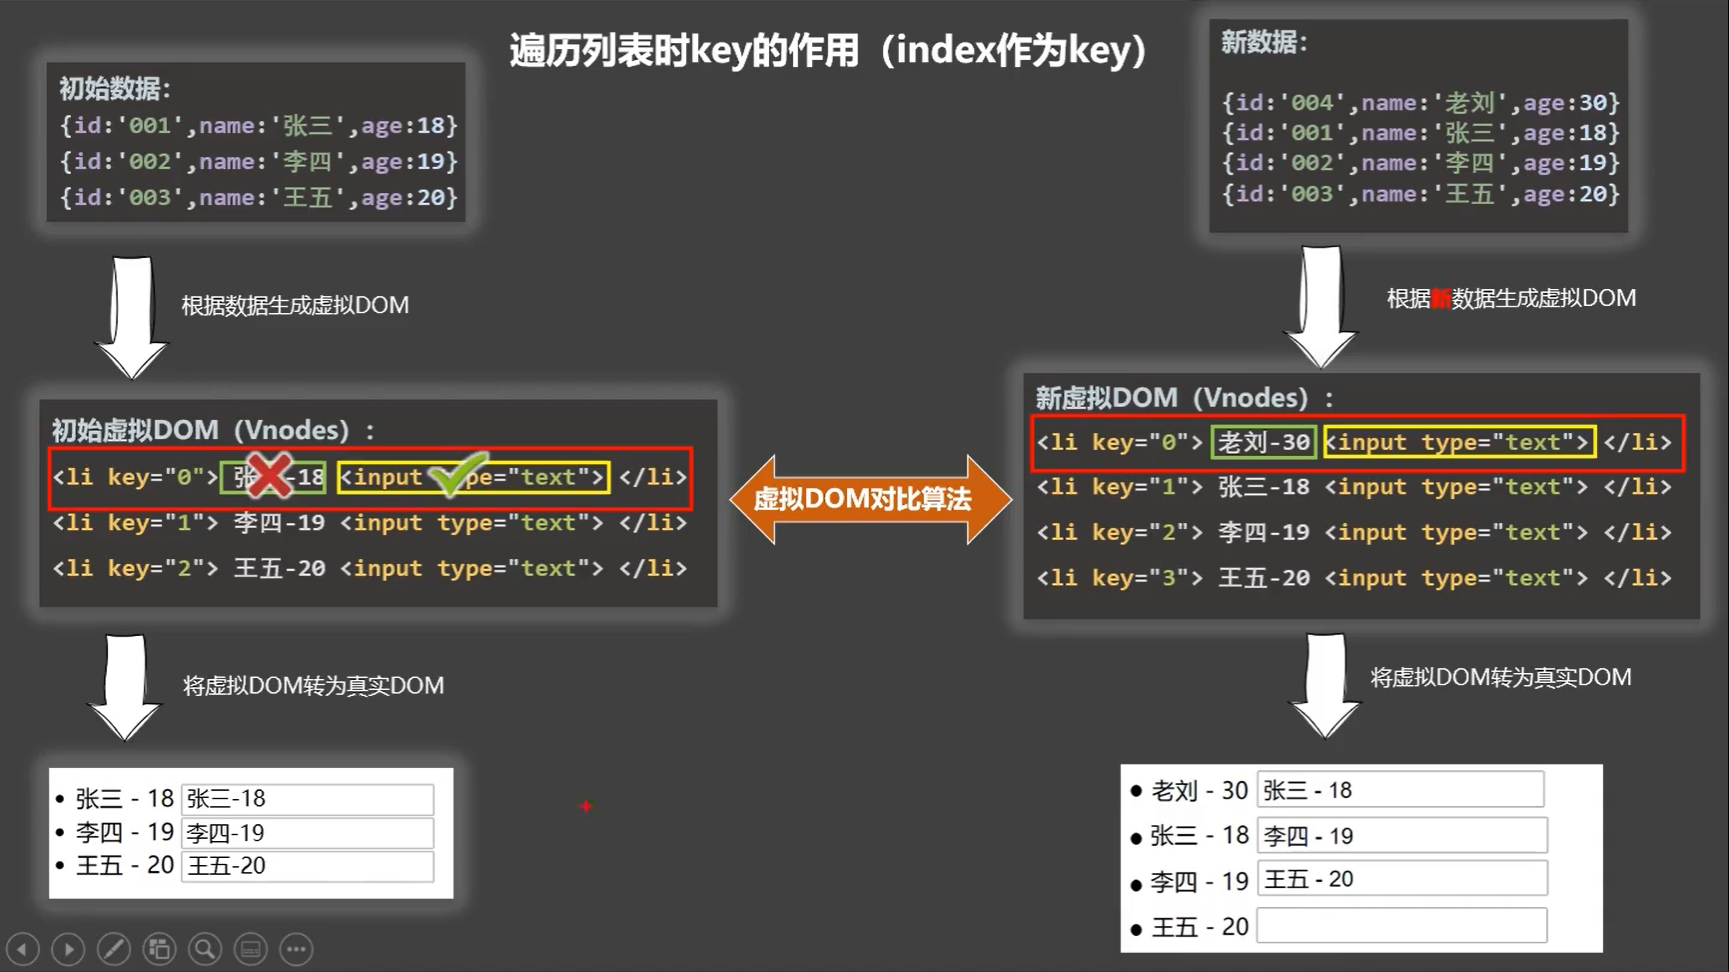
3. 用index作为key可能会引发的问题:
- 若对数据进行:逆序添加、逆序删除等破坏顺序操作,会产生没有必要的真实DOM更新 ==> 界面效果没问题, 但效率低。
- 如果结构中还包含输入类的DOM,会产生错误DOM更新 ==> 界面有问题。
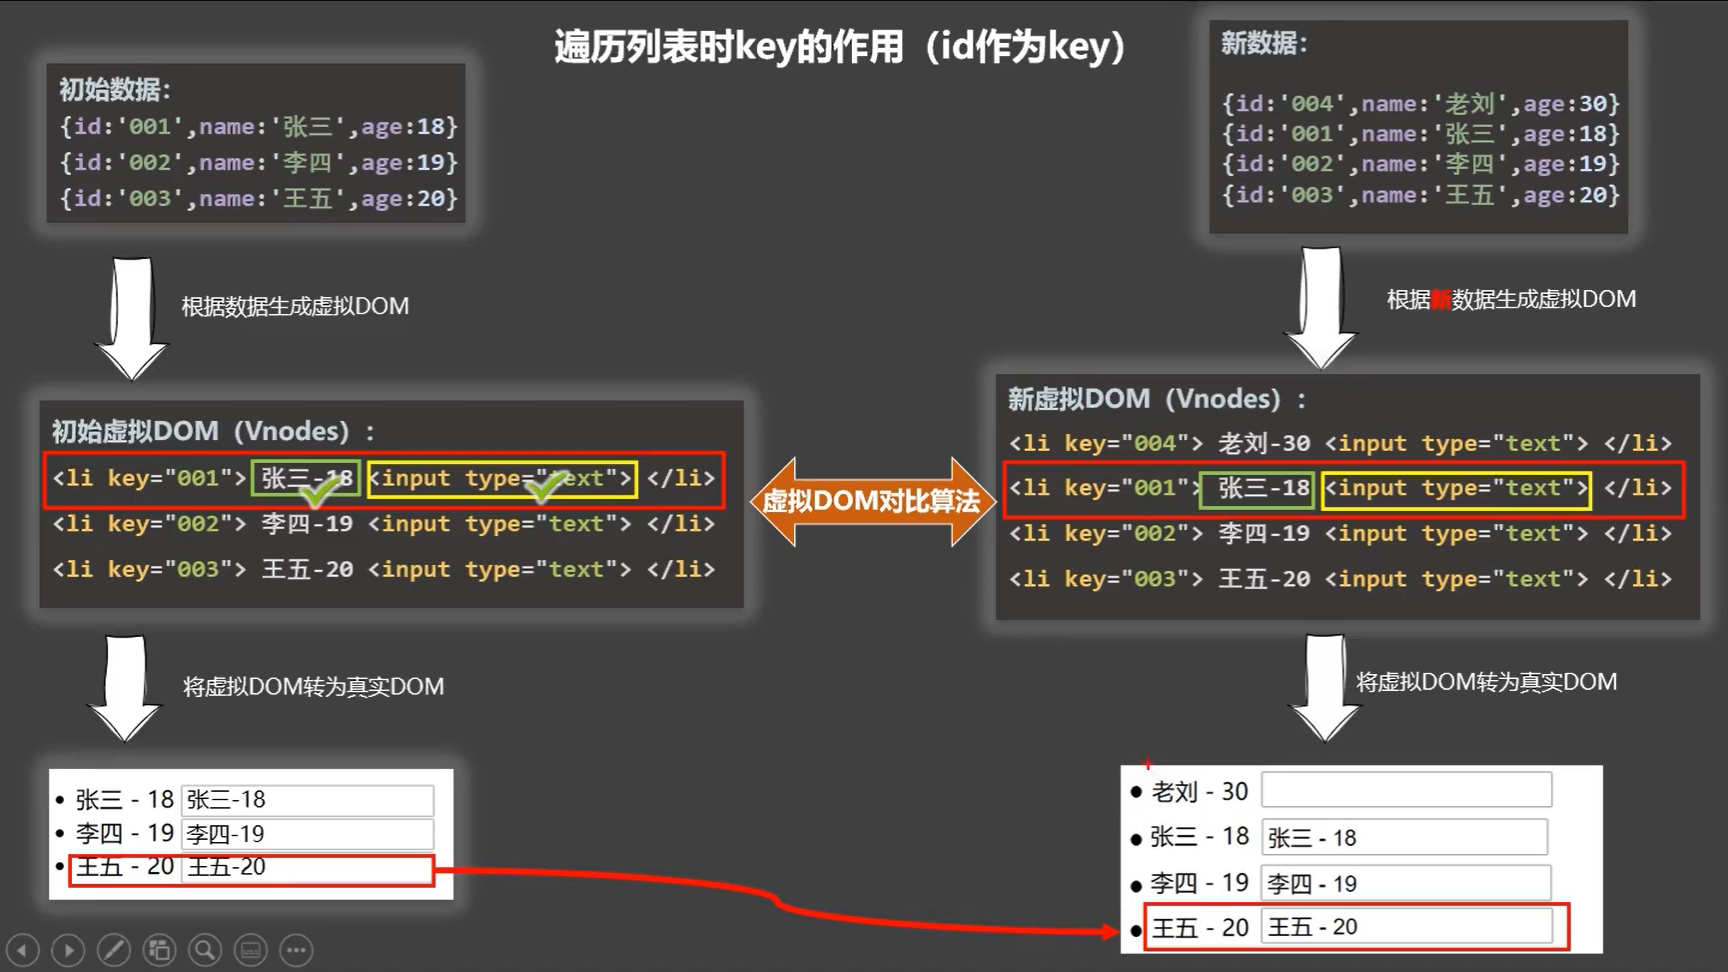
4. 开发中如何选择key?:
- 最好使用每条数据的唯一标识作为key, 比如id、手机号、身份证号、学号等唯一值。
- 如果不存在对数据的逆序添加、逆序删除等破坏顺序操作,仅用于渲染列表用于展示,使用index作为key是没有问题的。运行结果图如下:
1
2
3
4
5
6
7
8
9
10
11
12
13
14
15
16
17
18
19
20
21
22
23
24
25
26
27
28
29
30
31
32
33
34
35
36
37
38
39
40
41
42
43
44
45
<html>
<head>
<meta charset="UTF-8" />
<title>key的原理</title>
<script type="text/javascript" src="../js/vue.js"></script>
</head>
<body>
<!-- 准备好一个容器-->
<div id="root">
<!-- 遍历数组 -->
<h2>人员列表(遍历数组)</h2>
<button @click.once="add">添加一个老刘</button>
<ul>
<li v-for="(p,index) of persons" :key="index">
{{p.name}}-{{p.age}}
<input type="text">
</li>
</ul>
</div>
<script type="text/javascript">
Vue.config.productionTip = false
new Vue({
el:'#root',
data:{
persons:[
{id:'001',name:'张三',age:18},
{id:'002',name:'李四',age:19},
{id:'003',name:'王五',age:20}
]
},
methods: {
add(){
const p = {
id:'004',
name:'老刘',
age:40}
this.persons.unshift(p)
}
},
})
</script>
</html>

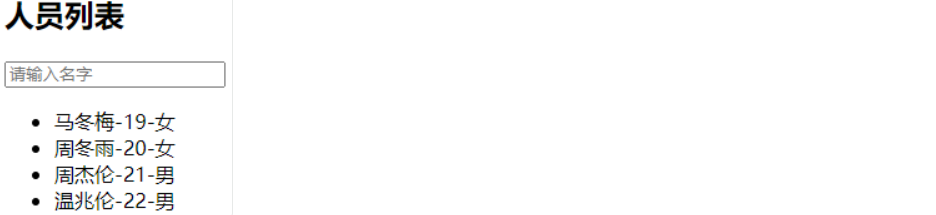
3. 列表过渡
列表过滤有两种方式:
- 用watch实现
- 用计算属性实现运行结果图如下:
1
2
3
4
5
6
7
8
9
10
11
12
13
14
15
16
17
18
19
20
21
22
23
24
25
26
27
28
29
30
31
32
33
34
35
36
37
38
39
40
41
42
43
44
45
46
47
48
49
50
51
52
53
54
55
56
57
58
59
60
61
62
63
64
65
66
67
68
69
70
71
72
<html>
<head>
<meta charset="UTF-8" />
<title>列表过滤</title>
<script type="text/javascript" src="../js/vue.js"></script>
</head>
<body>
<!-- 准备好一个容器-->
<div id="root">
<h2>人员列表</h2>
<input type="text" placeholder="请输入名字" v-model="keyWord">
<ul>
<li v-for="(p,index) of filPerons" :key="index">
{{p.name}}-{{p.age}}-{{p.sex}}
</li>
</ul>
</div>
<script type="text/javascript">
Vue.config.productionTip = false
//用watch实现
//#region
/* new Vue({
el:'#root',
data:{
keyWord:'',
persons:[
{id:'001',name:'马冬梅',age:19,sex:'女'},
{id:'002',name:'周冬雨',age:20,sex:'女'},
{id:'003',name:'周杰伦',age:21,sex:'男'},
{id:'004',name:'温兆伦',age:22,sex:'男'}
],
filPerons:[]
},
watch:{
keyWord:{
immediate:true,
//当 watch 一个变量的时候,初始化时并不会执行你需要在created的时候手动调用一次。添加immediate属性,这样初始化的时候也会触发
handler(val){
this.filPerons = this.persons.filter((p)=>{
return p.name.indexOf(val) !== -1
})
}
}
}
}) */
//#endregion
//用computed实现
new Vue({
el:'#root',
data:{
keyWord:'',
persons:[
{id:'001',name:'马冬梅',age:19,sex:'女'},
{id:'002',name:'周冬雨',age:20,sex:'女'},
{id:'003',name:'周杰伦',age:21,sex:'男'},
{id:'004',name:'温兆伦',age:22,sex:'男'}
]
},
computed:{
filPerons(){
return this.persons.filter((p)=>{
return p.name.indexOf(this.keyWord) !== -1
})
}
}
})
</script>
</html>
4. 列表排列
1 |
|
运行结果图如下: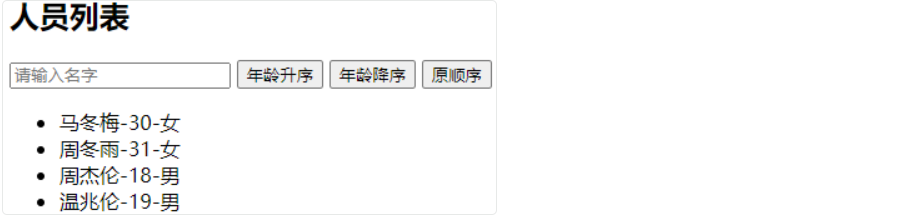
5. 更新时的一个问题
1 |
|
6. Vue监测数据改变的原理_对象
1 |
|
7. 模拟一个数据监测
1 |
|
8. Vue.set的使用
1 |
|
9. Vue监测数据改变的原理_数组
1 |
|
10. 总结Vue数据监测
- vue会监视data中所有层次的数据
- 如何监测对象中的数据?
通过setter实现监视,且要在new Vue()时就传入要监测的数据
- 对象创建后追加的属性,Vue默认不做响应式处理
- 如需给后添加的属性做响应式,请使用如下API
(1)Vue.set(target,propertyName/index,value)
(2)vm.$set(target,propertyName/index,value)
- 如何监测数组中的数据?
通过包裹数组更新元素的方法实现,本质就是做了两件事
(1)调用原生对应的方法对数组进行更新
(2)重新解析模板,进而更新页面 - 在Vue修改数组中的某个元素一定要用如下方法
push()pop()unshift()shift()splice()sort()reverse()这几个方法被Vue重写了Vue.set()或vm.$set()splice的使用:
特别注意:Vue.set()和vm.$set()不能给 vm 或 vm 的根数据对象(data等)添加属性1
2
3
4
5
6
7
8
9
10
11
12
13
14
15
16
17
18
19
20
21
22
23
24
25
26
27
28
29
30
31
32
33
34
35
36
37
38
39
40
41
42
43
44
45
46
47
48
49
50
51
52
53
54
55
56
57
58
59
60
61
62
63
64
65
66
67
68
69
70
71
72
73
74
75
76
77
78
79
80
81
82
83
84
85
86
87
<html>
<head>
<meta charset="UTF-8" />
<title>总结数据监视</title>
<style>
button{
margin-top: 10px;
}
</style>
<!-- 引入Vue -->
<script type="text/javascript" src="../js/vue.js"></script>
</head>
<body>
<!-- 准备好一个容器-->
<div id="root">
<h1>学生信息</h1>
<button @click="student.age++">年龄+1岁</button> <br/>
<button @click="addSex">添加性别属性,默认值:男</button> <br/>
<button @click="student.sex = '未知' ">修改性别</button> <br/>
<button @click="addFriend">在列表首位添加一个朋友</button> <br/>
<button @click="updateFirstFriendName">修改第一个朋友的名字为:张三</button> <br/>
<button @click="addHobby">添加一个爱好</button> <br/>
<button @click="updateHobby">修改第一个爱好为:开车</button> <br/>
<button @click="removeSmoke">过滤掉爱好中的抽烟</button> <br/>
<h3>姓名:{{student.name}}</h3>
<h3>年龄:{{student.age}}</h3>
<h3 v-if="student.sex">性别:{{student.sex}}</h3>
<h3>爱好:</h3>
<ul>
<li v-for="(h,index) in student.hobby" :key="index">
{{h}}
</li>
</ul>
<h3>朋友们:</h3>
<ul>
<li v-for="(f,index) in student.friends" :key="index">
{{f.name}}--{{f.age}}
</li>
</ul>
</div>
</body>
<script type="text/javascript">
Vue.config.productionTip = false //阻止 vue 在启动时生成生产提示。
const vm = new Vue({
el:'#root',
data:{
student:{
name:'tom',
age:18,
hobby:['抽烟','喝酒','烫头'],
friends:[
{name:'jerry',age:35},
{name:'tony',age:36}
]
}
},
methods: {
addSex(){
// Vue.set(this.student,'sex','男')
this.$set(this.student,'sex','男')
},
addFriend(){
this.student.friends.unshift({name:'jack',age:70})
},
updateFirstFriendName(){
this.student.friends[0].name = '张三'
},
addHobby(){
this.student.hobby.push('学习')
},
updateHobby(){
// this.student.hobby.splice(0,1,'开车')
// Vue.set(this.student.hobby,0,'开车')
this.$set(this.student.hobby,0,'开车')
},
removeSmoke(){
this.student.hobby = this.student.hobby.filter((h)=>{
return h !== '抽烟'
})
}
}
})
</script>
</html>
本博客所有文章除特别声明外,均采用 CC BY-NC-SA 4.0 许可协议。转载请注明来自 Tao ying!
相关推荐


评论